Zodのバリデーション
実装時間を短縮し
バックエンドとの整合性を保つ
2024/12/13
本記事は、NRIエンジニアによって2023年12月20日にQiitaに掲載されたものです。
NRI OpenStandia Advent Calendar 2023の 20日目担当のあやかです。
フロントエンドのバリデーション定義ファイルを自動生成出来ないか試してみたので紹介します
この記事の前提として、
- バリデーションライブラリとして、TypeScript first でスキーマ定義とバリデーション設定を行うことが出来るZodを使用
- OpenAPI Specification(以下OAS)とJSON Schemaからファイル生成出来るかを検証
- 手動でバリデーション定義をしたファイルと自動生成したファイルの両方のバリデーションチェックを適用出来るか検証
を行い、その結果を紹介する記事です。
結論を早く見たい方はこちら。
背景
業務でとあるWebアプリを開発しています。
このアプリは入力項目がとても多く、フロントエンドでもバックエンドでもバリデーションをかけなければいけないという要件があります。
そうなると、次のような問題が起きてきます。
- アプリ開発者が入力フォームのバリデーションを作成するのに時間がかかってしまう。
- フロントエンドとバックエンドでバリデーションがずれると困る。
(ただし、バックエンドでしか出来ないチェック(DB接続が必要なもの等)は除く)
過去のプロジェクトではバックエンド側がAPI定義書としてOASを用意し、それを見てフロントエンド側のチェックを実装していました。
ただし、OASを目視で確認していたため、ずれている可能性がありました。
また、バックエンド側がAPI定義書を更新した場合、フロントエンドのバリデーションチェック実装も都度都度変更しなければなりません。
そのプロジェクトでは入力項目も少なかったため大きな課題にはならなかったですが、現在開発しているアプリは入力項目が多いため、この課題に対応することにしました。
そこで、上記2つの問題を解決出来る方法がないか探していたところ、Zodファイルを自動生成出来るライブラリがいくつも見つかりました。
今回は、Zodファイルの自動生成のもととなるファイルがバックエンドでも使えるようなものにしたく、、
- OASからZodファイルを自動生成するライブラリ
- JSON SchemaからZodファイルを自動生成するライブラリ
を試してみました。
使用するライブラリ
openapi-zod-client
- OAS 仕様 (json/yaml) から Zodios (Zod 検証を備えた typescript http クライアント) を生成する。
- そもそもOASとは、REST API定義(APIのエンドポイント、パラメータ、レスポンスなど)を記述するフォーマット。
json-schema-to-zod
- JSON スキーマオブジェクトまたはファイルを JavaScript コード形式の Zod スキーマに変換する。
- そもそもJSON スキーマとは、JSONデータの構造(JSONデータのキー、値、オブジェクト、配列、データ型、制約など)を定義するためのスキーマ言語。
使ってみる
openapi-zod-client
準備
1.自動生成の元となるOAS仕様を記述したyamlファイルを作成します。
今回はSwagger Editorで用意されているSample APIを使用します。
sample.yaml
openapi: 3.0.3
info:
  title: Sample API
  version: 0.0.1
  description: sample
  contact:
    name: dummy
servers:
  - url: http://localhost:8080/api/v1
paths:
  /sample:
    post:
      summary: Post Sample API
      tags:
        - sample
      parameters: []
      requestBody:
        content:
          application/json:
            schema:
              $ref: '#/components/schemas/SampleRequest'
      responses:
        '200':
          description: Ok
          content:
            application/json:
              schema:
                $ref: '#/components/schemas/SampleResponse'
components:
  schemas:
    SampleResponse:
      title: Sample API Response
      properties:
        totalCount:
          type: integer
          format: int64
          description: total count of search results in DB
          minimum: 0
          example: 12345
        count:
          type: integer
          format: int32
          description: count of search results retrived by API
          minimum: 0
          example: 50
        offset:
          type: integer
          format: int32
          description: starting position to fetch, same as first item index in the page
          minimum: 0
          example: 200
        limit:
          type: integer
          format: int32
          description: max count that can be rerieved from DB at once, same as item count per page
          minimum: 0
          example: 50
      required:
        - totalCount
        - count
        - offset
      x-code-samples:
        if: "queryParams.totalCount == 10"
        then: |
          if (!queryParams.limit) {
            throw new Error('Limit is required when totalCount is 10');
          }
    SampleRequest:
      properties:
        departmentId:
          type: integer
          format: int64
          description: 部署ID
          example: 10000
        familyName:
          type: string
          description: 姓
          minLength: 1
          maxLength: 32
          example: Suzuki
        givenName:
          type: string
          description: 名
          minLength: 1
          maxLength: 32
          example: Ichiro
        phoneNumber:
          type: string
          description: 電話番号
          pattern: '^\d+-\d+-\d+$'
          maxLength: 13
          example: 000-0000-0000
      required:
        - familyName
        - givenName
        - phoneNumber
2.openapi-zod-clientをnpm installします。
npm i openapi-zod-client3.出力するファイルを格納するフォルダを作成します。
実行
ターミナルでコマンドを実行します。
npx openapi-zod-client <もとになるファイルが置かれているパス> -o <出力するファイルのパス>実行結果
出力されたファイルはこちらです。
sample.ts
import { makeApi, Zodios, type ZodiosOptions } from '@zodios/core'
import { z } from 'zod'

const SampleRequest = z
  .object({
    departmentId: z.number().int().optional(),
    familyName: z.string().min(1).max(32),
    givenName: z.string().min(1).max(32),
    phoneNumber: z
      .string()
      .max(13)
      .regex(/^\d+-\d+-\d+$/),
  })
  .passthrough()
const SampleResponse = z
  .object({
    totalCount: z.number().int().gte(0),
    count: z.number().int().gte(0),
    offset: z.number().int().gte(0),
    limit: z.number().int().gte(0).optional(),
  })
  .passthrough()

export const schemas = {
  SampleRequest,
  SampleResponse,
}

const endpoints = makeApi([
  {
    method: 'post',
    path: '/sample',
    alias: 'postSample',
    requestFormat: 'json',
    parameters: [
      {
        name: 'body',
        type: 'Body',
        schema: z
          .object({
            departmentId: z.number().int().optional(),
            familyName: z.string().min(1).max(32),
            givenName: z.string().min(1).max(32),
            phoneNumber: z
              .string()
              .max(13)
              .regex(/^\d+-\d+-\d+$/),
          })
          .passthrough(),
      },
    ],
    response: z
      .object({
        totalCount: z.number().int().gte(0),
        count: z.number().int().gte(0),
        offset: z.number().int().gte(0),
        limit: z.number().int().gte(0).optional(),
      })
      .passthrough(),
  },
])

export const api = new Zodios(endpoints)

export function createApiClient(baseUrl: string, options?: ZodiosOptions) {
  return new Zodios(baseUrl, endpoints, options)
}項目ごとのバリデーションの定義は出力されていますが、endpoints等Zodios(Zodのスキーマ定義を活用したAPIクライアント)不要な部分も含まれてしまっています。
そこで、バリデーション定義部分のみ出力されるように変更します。
バリデーション定義のみ出力されるよう変更
1.HBSファイルを作成します。
今回はopenapi-zod-clientで用意されているファイルを使用します。
schemas-only.hbs
import { z } from "zod";

{{#each schemas}}
const {{@key}} = {{{this}}};
{{/each}}

export const schemas = {
{{#each schemas}}
  {{@key}},
{{/each}}
};
2.ターミナルでコマンドを実行します。
npx openapi-zod-client <もとになるファイルが置かれているパス> -o <出力するファイルのパス> -t <hbsファイルのパス> --export-schemasオプションを指定して実行後に出力されたファイル
automaticOpenapiSample.ts
import { z } from 'zod'

const SampleRequest = z
  .object({
    departmentId: z.number().int().optional(),
    familyName: z.string().min(1).max(32),
    givenName: z.string().min(1).max(32),
    phoneNumber: z
      .string()
      .max(13)
      .regex(/^\d+-\d+-\d+$/),
  })
  .passthrough()
const SampleResponse = z
  .object({
    totalCount: z.number().int().gte(0),
    count: z.number().int().gte(0),
    offset: z.number().int().gte(0),
    limit: z.number().int().gte(0).optional(),
  })
  .passthrough()

export const schemas = {
  SampleRequest,
  SampleResponse,
}
json-schema-to-zod
準備
1.自動生成の元となるJSON スキーマを記述したjsonファイルを作成します。 今回はJSON Schemaで用意されているサンプルスキーマを使用します。
sampleSchema.json
{
  "$schema": "https://json-schema.org/draft/2020-12/schema",
  "$id": "https://example.com/product.schema.json",
  "title": "Product",
  "description": "A product from Acme's catalog",
  "type": "object",
  "properties": {
    "productId": {
      "description": "The unique identifier for a product",
      "type": "integer"
    },
    "productName": {
      "description": "Name of the product",
      "type": "string"
    },
    "price": {
      "description": "The price of the product",
      "type": "number",
      "exclusiveMinimum": 0
    },
    "tags": {
      "description": "Tags for the product",
      "type": "array",
      "items": {
        "type": "string"
      },
      "minItems": 1,
      "uniqueItems": true
    },
    "dimensions": {
      "type": "object",
      "properties": {
        "length": {
          "type": "number"
        },
        "width": {
          "type": "number"
        },
        "height": {
          "type": "number"
        }
      },
      "required": ["length", "width", "height"]
    }
  },
  "required": ["productId", "productName", "price"]
}
2.openapi-zod-clientをnpm installします。
npm i json-schema-to-zod3.出力するファイルを格納するフォルダを作成します。
実行
ターミナルでコマンドを実行します。
npx json-schema-to-zod -i <もとになるファイルが置かれているパス> -o <出力するファイルのパス>実行結果
出力されたファイルはこちらです。
sample.ts
import { z } from "zod"

export default z.object({ "productId": z.number().int().describe("The unique identifier for a product"), "productName": z.string().describe("Name of the product"), "price": z.number().gt(0).describe("The price of the product"), "tags": z.array(z.string()).min(1).describe("Tags for the product").optional(), "dimensions": z.object({ "length": z.number(), "width": z.number(), "height": z.number() }).optional() }).describe("A product from Acme's catalog")
定義は出力されていますが、改行が出来ておらず見にくい状態です。
整形された状態で出力されるよう変更します。
整形された状態で出力されるよう変更
1.prettierをインストールします。
npm i -g prettier2.ターミナルでコマンドを実行します。
npx json-schema-to-zod -i <もとになるファイルが置かれているパス> | prettier --parser typescript > <出力するファイルのパス>整形された状態で出力されるよう変更したあとに出力されたファイル
出力されたファイルはこちらです。
automaticJsonschemaSample.ts
import { z } from 'zod'

export default z
  .object({
    productId: z.number().int().describe('The unique identifier for a product'),
    productName: z.string().describe('Name of the product'),
    price: z.number().gt(0).describe('The price of the product'),
    tags: z.array(z.string()).min(1).describe('Tags for the product').optional(),
    dimensions: z.object({ length: z.number(), width: z.number(), height: z.number() }).optional(),
  })
  .describe("A product from Acme's catalog")
問題点
自動で生成することは出来ましたが、仮に
①バリデーション定義ファイルを自動生成
②自動生成したファイルに手動でロジックを含むバリデーションチェックを追記
③OASやJSON Schemaファイルが変更されたので、再度自動生成
④手動で追記したロジックを含むチェックを、新しく自動生成したファイルに追記
という流れが起きた場合、④は面倒ですよね、、?
そこで、自動生成したZodファイルと手動実装したZodファイルを別に作成し、その2つのファイルをどちらも適用することが出来るか試してみます。
- .intersection()
- .and()
- .merge()
- .extend()
あたりを使えば、2つのバリデーションファイルを適用することが出来そうです。
上記4つを比較してみます。
今回はopenapi-zod-clientを使用して作成した自動生成ファイルautomaticOpenapiSample.tsと手動でバリデーション定義を実装したこちらのファイルを用いて検証することにします。
manualOpenapi.ts
import { z } from 'zod'

import { schemas } from '../output/automaticOpenapiSample'

const ManualDefinitionValidation1 = z.object({
  departmentId: z.number().refine(
    (val) => {
      if (val !== undefined && Number(val) >= 20) {
        return Number(String(val).slice(-1)) === 0
      }
      return true
    },
    { message: 'IDが20以上の場合、数値の末尾は0です。' },
  ),
  phoneNumber: z.string().min(1),
})

const ManualDefinitionValidation2 = z.object({
  givenName: z.string().regex(/^[a-zA-Z]*$/),
})
サンプルの入力フォーム画面も載せておきます。 MUIとReact Hook Formを使用していますが、ここでは説明を省略します。
SamplePage.tsx
import { Button, InputLabel, FormControl, Input, FormHelperText, Grid } from '@mui/material'
import { useForm } from 'react-hook-form'
import { zodResolver } from '@hookform/resolvers/zod'

import { MergedSample, mergedSampleScheme } from '../manual/manualOpenapi'

export const SampleOpenapiPage = () => {
  const {
    handleSubmit,
    register,
    formState: { errors },
  } = useForm<MergedSample>({
    resolver: zodResolver(mergedSampleScheme),
  })

  return (
    <form
      onSubmit={(e) => {
        void handleSubmit((inputData) => {
          console.log(inputData)
        })(e)
      }}
    >
      <Grid sx={{ mb: 2 }}>
        <FormControl error={!!errors.departmentId}>
          <InputLabel>departmentId</InputLabel>
          <Input {...register('departmentId', { valueAsNumber: true })} />
          <FormHelperText error>{errors.departmentId?.message}</FormHelperText>
        </FormControl>
      </Grid>
      <Grid sx={{ mb: 2 }}>
        <FormControl error={!!errors.familyName}>
          <InputLabel>familyName</InputLabel>
          <Input {...register('familyName')} />
          <FormHelperText error>{errors.familyName?.message}</FormHelperText>
        </FormControl>
      </Grid>
      <Grid sx={{ mb: 2 }}>
        <FormControl error={!!errors.givenName}>
          <InputLabel>givenName</InputLabel>
          <Input {...register('givenName')} />
          <FormHelperText error>{errors?.givenName?.message}</FormHelperText>
        </FormControl>
      </Grid>
      <Grid sx={{ mb: 2 }}>
        <FormControl error={!!errors.phoneNumber}>
          <InputLabel>phoneNumber</InputLabel>
          <Input {...register('phoneNumber')} />
          <FormHelperText error>{errors.phoneNumber?.message}</FormHelperText>
        </FormControl>
      </Grid>
      <Button type="submit"> 送信</Button>
    </form>
  )
}
複数のZodバリデーション定義ファイルを適用させる
.intersection()
manualOpenapi.tsに結合する実装を書きます。
manualOpenapi.ts
import { z } from 'zod'
import { schemas } from '../output/automaticOpenapiSample'
const ManualDefinitionValidation1 = z.object({
// ...省略
})
const ManualDefinitionValidation2 = z.object({
// ...省略
})
// スキーマを結合させる(intersection)
export const mergedSampleScheme = z
.intersection(schemas.SampleRequest, ManualDefinitionValidation1, ManualDefinitionValidation2)
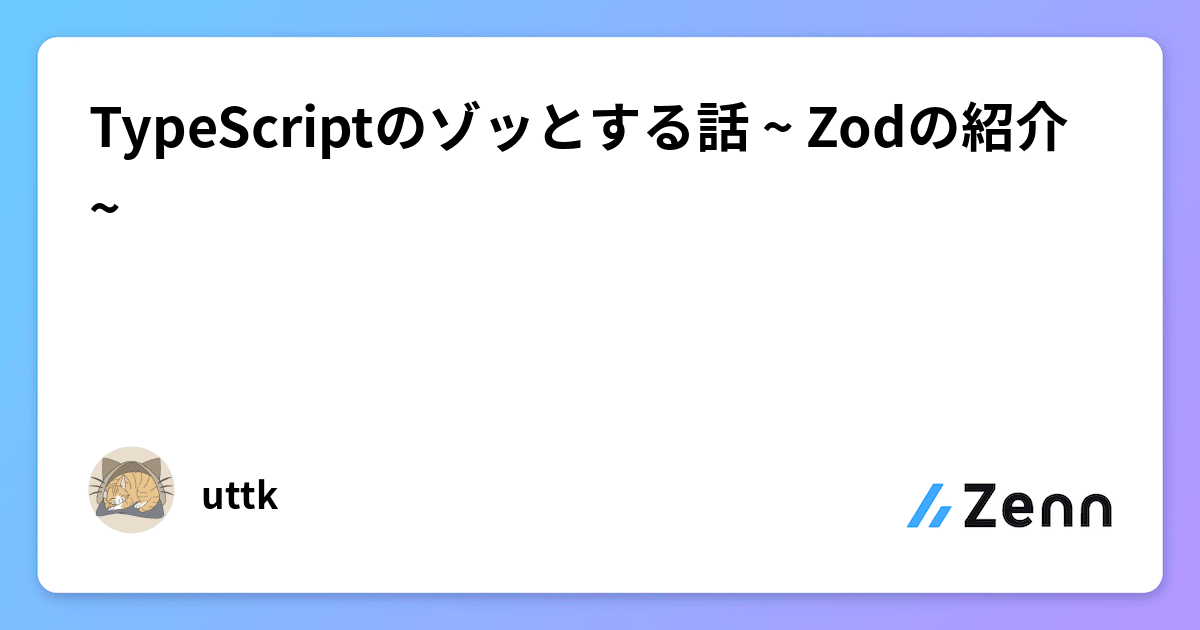
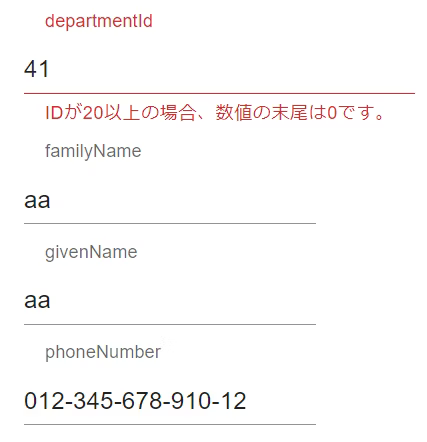
export type MergedSample = z.infer<typeof mergedSampleScheme>画面を表示してみます。
givenName項目に英文字以外の文字が入力されていてもエラーになっていないため、ManualDefinitionValidation2のチェックがされていないことが分かります。 .intersection()は3つ以上のスキーマの結合は出来ません。 また、mergedSampleSchemeの後ろに.pick()メソッドをつけるとIntersection型のため、pickやomitのようなメソッドが使用出来ないとも分かりました。
manualOpenapi.ts
// ...省略

// これは出来ない
export const mergedSampleScheme = z.intersection(
  schemas.SampleRequest,
  ManualDefinitionValidation1,
  ManualDefinitionValidation2,
).pick({familyName: true, givenName: true})
.and()
manualOpenapi.ts
// ...省略
// スキーマを結合させる(and)
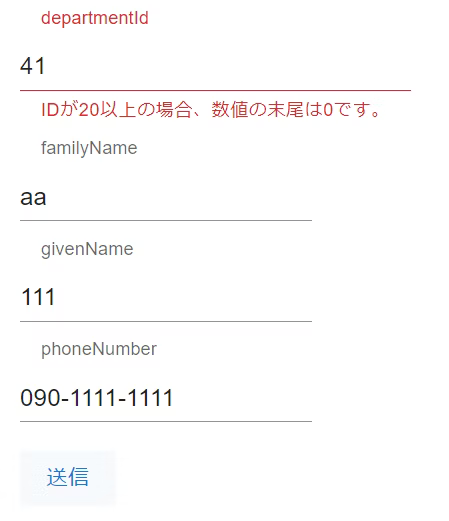
export const mergedSampleScheme = schemas.SampleRequest.and(ManualDefinitionValidation1).and(ManualDefinitionValidation2)画面表示をすると
となり、givenName項目のManualDefinitionValidation2のチェックがされていることが分かります。
.and()は3つ以上のスキーマの結合が可能です。
ただし、.intersection()と同じく結合後の型はIntersection型のため、オブジェクトメソッドは使用出来ません。
.merge()
manualOpenapi.ts
// ...省略
// スキーマを結合させる(merge)
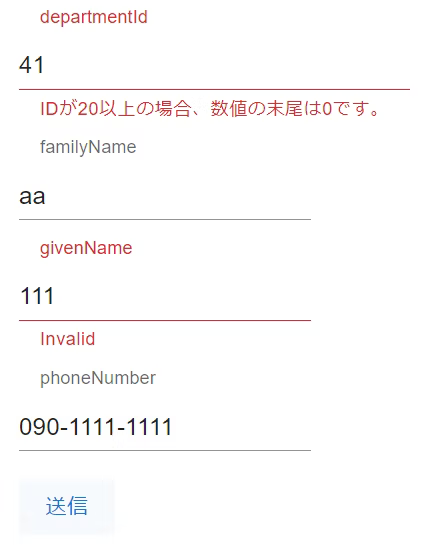
export const mergedSampleScheme = schemas.SampleRequest.merge(ManualDefinitionValidation1).merge(ManualDefinitionValidation2)画面表示します。
自動生成で作成されたチェックである
automaticOpenapiSample.ts
phoneNumber: z.string().max(13).regex(/^\d+-\d+-\d+$/)がされていないことが分かります。 自動生成で作成されたチェックをManualDefinitionValidation1で上書きしてしまい、
manualOpenapi.ts
phoneNumber: z.string().min(1),のチェックしかされないためです。
extend()
ここで注意が必要なのが、.extend()の引数は.shapeをつけてスキーマにアクセスしないと型エラーが起きてしまいます。
manualOpenapi.ts
// ...省略
// スキーマを結合させる(extend)
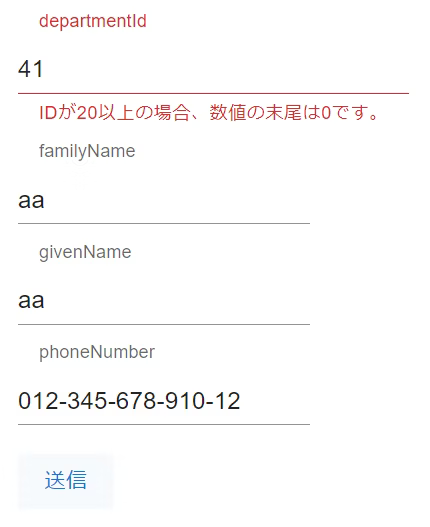
export const mergedSampleScheme = schemas.SampleRequest.extend(ManualDefinitionValidation1.shape).extend(ManualDefinitionValidation2.shape)画面表示すると
のように、.merge()と同じく、ManualDefinitionValidation1で上書きしてしまうことが分かります。
比較結果
以上をまとめるとこのようになります。
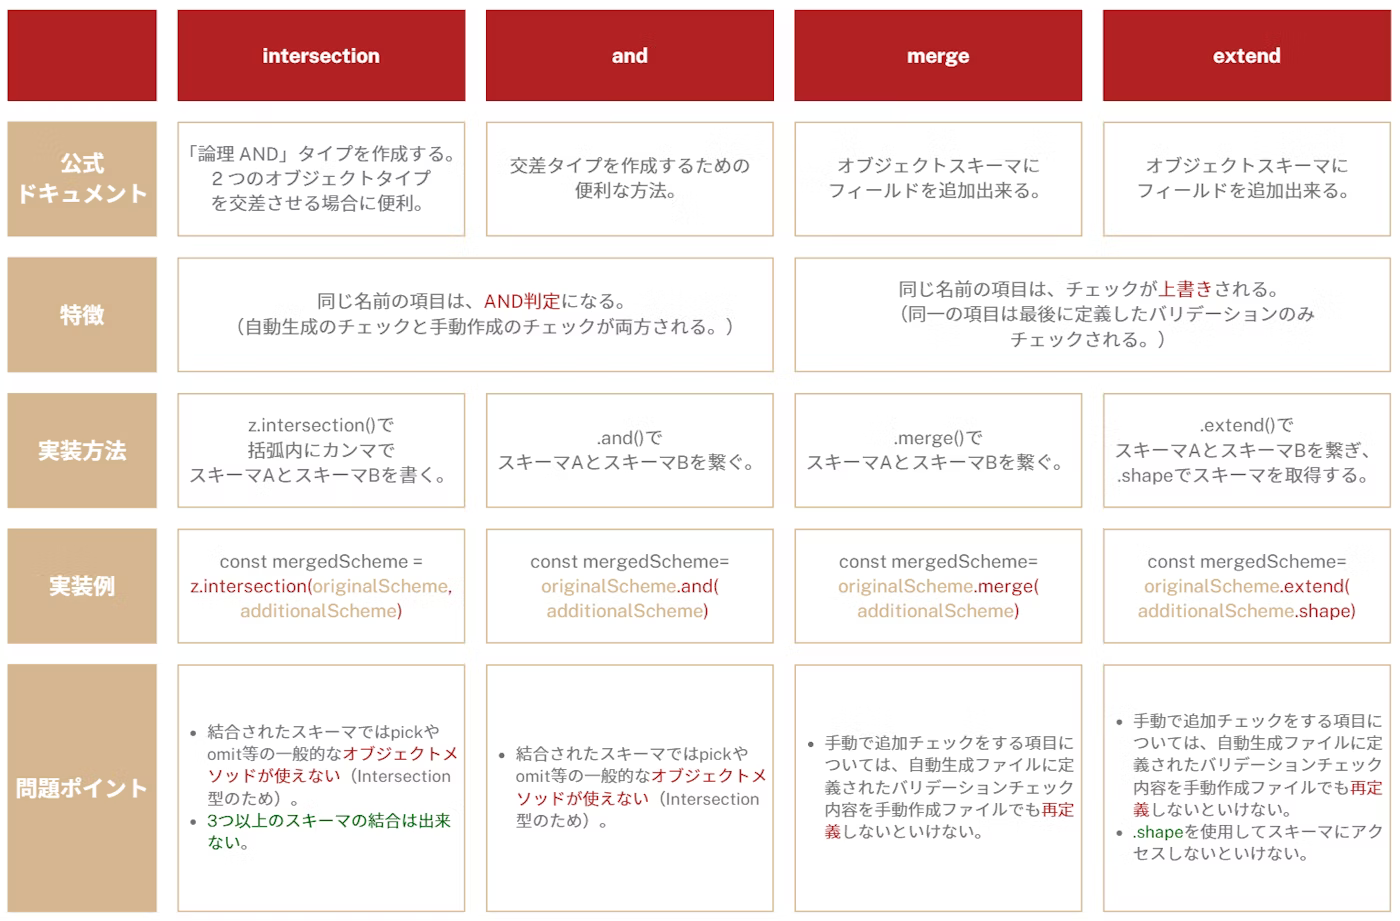
上記表より、
- .pick()等のオブジェクトメソッドを使用しない場合は、.and()を使用するべき
- オブジェクトメソッドを使用する場合は、.merge()を使用し、手動でチェックを追加する項目については、自動生成された項目も再度定義しなおす
という方法が良いです。
ちなみに、複数項目を使った.refine()は複数のスキーマを結合したあとに定義します。
manualOpenapi.ts
// ...省略

export const mergedSampleScheme = schemas.SampleRequest.and(ManualSampleRequest)
  .and(AddRequest)
  // ここにrefine()を定義する
  .refine((val) => val.familyName.length + val.givenName.length <= 20, {
    message: '姓と名の文字数の合計は20文字まで',
    path: ['givenName'],
  })

export type MergedSample = z.infer<typeof mergedSampleScheme>
まとめ
- openapi-zod-clientやjson-schema-to-zodのようなZodへ変換するライブラリを使用して、自動でバリデーション定義ファイルを生成することが出来ました。
- ロジックによるチェックや、エラーメッセージのカスタマイズが必要な場合は手動で別のバリデーション定義を書く必要があります。
- 自動生成ファイルと手動生成ファイルの両方のチェックを適用させる場合は以下のようにします。
- 基本的には.and()を使用します。
- ただし、オブジェクトメソッドを使用する場合は、.merge()を使用します。
- .merge()を使用する場合は、追加定義する項目について、自動生成されたチェックも再度定義しなおす必要があります。
感想
バックエンドの開発者がOASやJSON Schemaを作成する場合、Zodへ変換するライブラリを使用すれば、フロントの開発者の手間が少し省け、生産性をあげることが出来そうです。
また、自動で生成されるので、バックエンドのチェックとフロントエンドのチェックのずれを減らせると思いました。